How Do I Install a Toilet Flange? (2025 DIY + Pro Guide)
If you’ve been searching how do I install a toilet flange because a toilet rocks or you’re updating flooring, this guide walks you through the role of the flange, tools and prep, correct height, methods for wood and concrete, repair options for older systems, the right seal to choose, and the precise final set. Follow along and you’ll end up with a stable, leak-free toilet that feels brand new.
Contents
- 1 What a Toilet Flange Does & Why It Matters
- 2 Tools & Materials Checklist
- 3 Prep Work: Safe Removal and Inspection
- 4 Setting Correct Flange Height (On Top of Finished Floor)
- 5 Installation on Wood Subfloors
- 6 Installation on Concrete Slabs
- 7 Repair vs. Replace: Damaged or Cast-Iron Flanges
- 8 Choosing the Seal: Wax vs. Wax-Free
- 9 Final Set: Closet Bolts, Seal, and Toilet
- 10 FAQs
- 11 Conclusion
What a Toilet Flange Does & Why It Matters
A toilet flange is the hardware that anchors the toilet to the floor and seals the drain connection. Anyone asking how do I install a toilet flange is really asking how to achieve two outcomes at once: a rock-solid base and an airtight, watertight seal to block sewer gas and prevent hidden moisture around the base.

The Seal and the Structure
Think of the flange as the anchor and the gasket as the barrier. The ring holds closet bolts that clamp the toilet to the floor so it can’t shift. The wax or wax-free seal compresses between the toilet horn and the flange to keep wastewater where it belongs. When the anchor is firm and the seal is evenly compressed, the toilet won’t wobble—and that’s the foundation of a durable, drip-free result.
Parts You’ll Work With
Most modern homes use a PVC or ABS flange with a fixed or rotating ring; older homes may have cast iron. You’ll work with closet bolts and nuts, corrosion-resistant screws or anchors, a wax or wax-free gasket, shims for leveling, and bathroom-grade caulk for a neat perimeter. While removing and resetting, you’ll also touch the shutoff valve and supply line—good moments to check for wear.
Tools & Materials Checklist
Arriving at the moment of how do I install a toilet flange without every tool nearby is how delays—and mistakes—happen. Lay everything out first to keep the project smooth.
Core Tools
Plan on an adjustable wrench for the supply connection, screwdrivers for caps and ring screws, a drill/driver for fasteners, and a level to verify the ring sits flat. A tape measure confirms rough-in and bolt spacing. A scraper removes old wax, while a shop vac keeps debris out of the drain. Gloves, eye protection, and knee pads make the job safer and more comfortable.
Materials by Subfloor Type
For wood, use stainless or coated screws long enough to bite into solid material or added blocking. For concrete, you’ll need a hammer drill, masonry bit, and Tapcons or sleeve anchors. If bonding to plastic pipe, have the correct primer and cement; if you encounter cast iron, consider a compression or inside-fit flange designed for that material. Always use new closet bolts and a fresh seal—reusing old parts risks leaks.
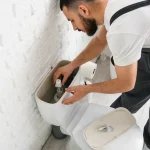
Prep Work: Safe Removal and Inspection
Anyone learning how do I install a toilet flange should start with meticulous prep. Careful removal protects your finishes and reveals issues you’ll want to fix before reassembly.

Shut Off, Drain, and Remove
Turn the shutoff clockwise, flush to empty, and sponge remaining water from the tank and bowl. Disconnect the supply line and lift the toilet straight up to keep any residual wax off the floor. Set it on a protected surface and plug the drain with a rag to block odors while you work.
Scrape and Inspect the Drain
Remove every bit of old wax so the new seal can seat properly. Inspect the flange ring for cracks or elongated bolt slots and check the surrounding floor for softness, staining, or swelling. Note how the flange height compares to the finished floor; that single detail determines whether you’ll add a spacer, install a new flange, or proceed as-is.
Setting Correct Flange Height (On Top of Finished Floor)
A common reason people ask how do I install a toilet flange is trouble with height after new flooring. The golden rule: the top of the flange belongs on the finished floor, not the subfloor.
Height Targets and Why They Matter
When the sealing surface is flush with—or slightly above—the finished floor, the gasket compresses evenly and the toilet sits stable. A low flange under-compresses the seal and invites seepage; a high flange can cause rocking or hairline stress in the porcelain when bolts are tightened.
Using Spacers or Extenders
If new tile or LVP raised the floor, install a flange extender or spacer to lift the sealing surface. Align bolt slots correctly, seal between layers per manufacturer guidance, and use longer closet bolts so the nuts fully engage. This is an efficient fix that avoids tearing into a perfectly good drain.
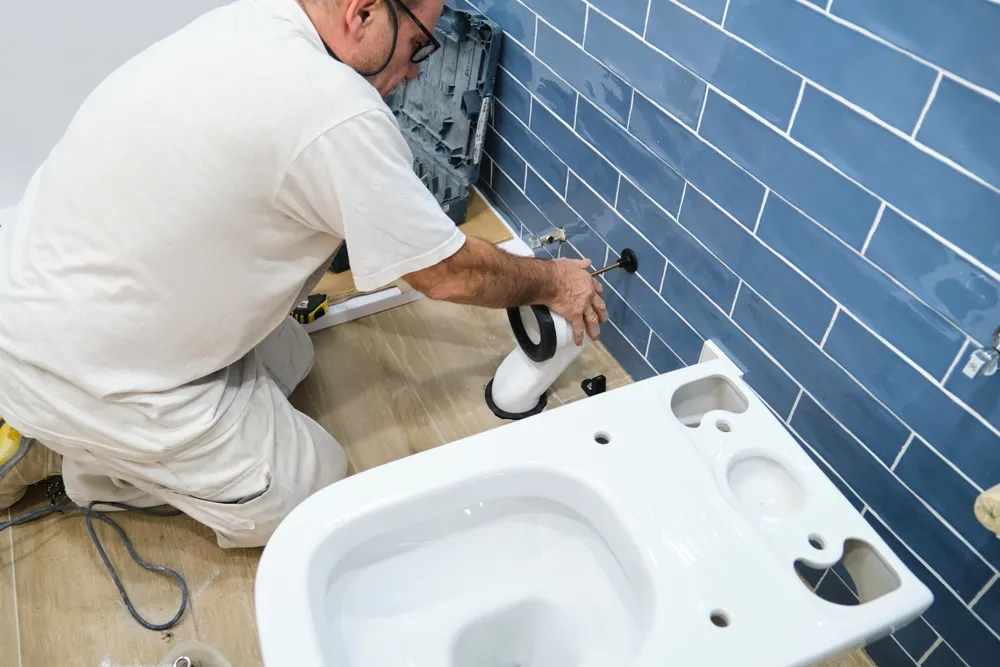
Installation on Wood Subfloors
Wood installs focus on centering, slot orientation, and fastening into sound material so the toilet can’t shift over time. This is where many first-timers master how do I install a toilet flange with confidence.
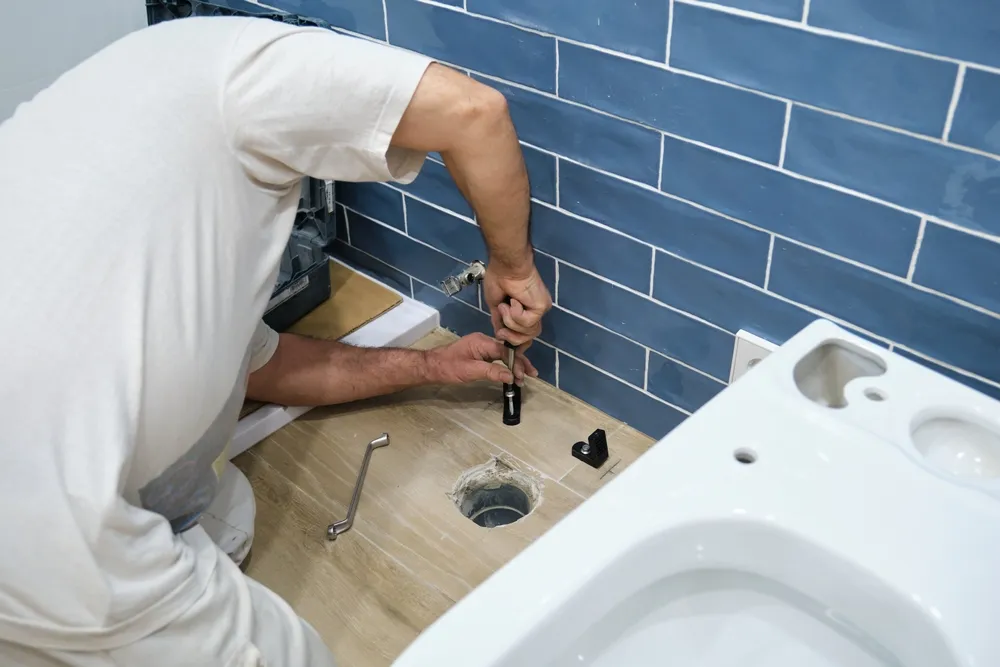
Dry Fit and Orient the Slots
Center the flange over the pipe and verify it’s square to the wall. Rotate the ring so the closet-bolt slots sit at 12 and 6 o’clock—one toward the wall, one toward the room—matching the toilet’s base channels. Mark pilot holes and make sure there’s solid wood below each location; add blocking if needed.
Fasten with Stainless Screws
Pre-drill and drive screws until the ring sits flat with no gaps. If the subfloor is weakened or the hole lands on a seam, reinforce with blocking or use a repair ring that sandwiches over the existing flange. A rigid, level ring now prevents future rocking and protects the seal.
Installation on Concrete Slabs
On concrete, how do I install a toilet flange comes down to drilling accurately and using anchors that won’t loosen in a humid bathroom environment.
Anchor Options
Use a hammer drill with a properly sized masonry bit for Tapcons or sleeve anchors. Drill straight to full depth, vacuum dust from each hole, and choose corrosion-resistant fasteners so your hardware stays tight for years.
Level and Secure
Set the flange on the finished floor and check level in both directions. If it rocks, shim beneath the ring before anchoring, then tighten in a star pattern so the ring draws down evenly. Re-check level after tightening; even slight tilt can translate into a wobbly toilet.
Repair vs. Replace: Damaged or Cast-Iron Flanges
Sometimes how do I install a toilet flange becomes how do I save this one. The right choice depends on the condition of the ring and the pipe material.
Repair Rings and Split-Rings
If bolt ears are cracked or slots are stretched, a stainless or polymer repair ring can overlay the old flange and create strong, new bolt channels. Fasten it securely through the floor or into anchors so the overlay becomes the structural surface.
Cast-Iron Considerations
For sound cast-iron pipe, an inside-fit compression flange can deliver a durable new sealing surface. If the hub or lead/oakum joint is failing, full replacement is safer. Cast-iron work is unforgiving—calling a pro here is often the best money you’ll spend.
Choosing the Seal: Wax vs. Wax-Free
Seal choice is where many DIYers finalize their plan for how do I install a toilet flange without leaks. Match the gasket to your height and floor conditions.

Classic Wax Rings
Wax is inexpensive, widely available, and dependable. You can choose standard or extra-thick rings to dial in compression. The tradeoff is single-use—if you lift the toilet to adjust shims, you’ll need a new ring.
Wax-Free Gaskets
Wax-free options are clean to handle and often allow reseating, which helps when you’re perfecting shim placement on slightly uneven floors. Many include funnels or adjustable collars to accommodate small height differences; just verify compatibility with your flange and toilet horn.
Final Set: Closet Bolts, Seal, and Toilet
This final step is where precision pays off. People who learn how do I install a toilet flange successfully tend to slow down here and work methodically.
Lock in the Bolts and Seal
Slide new closet bolts into the ring and secure them upright with keepers or washers. Place the gasket on the flange (or under the horn if the manufacturer specifies). Lower the bowl straight down over the bolts without twisting so you don’t smear wax or dislodge a gasket. If the toilet rocks, shim at the low points before tightening.
Tighten, Connect, and Test
Snug the nuts a little at a time, alternating sides to compress the seal evenly. Stop as soon as rocking disappears—overtightening can crack the base. Reconnect the supply line, open the valve, and flush several times. Check around the base and at the connection for moisture. Finish with a clean bead of caulk around the perimeter, leaving a small gap at the back as a weep path.