
How to Secure Kitchen Island to Floor Without Damaging the Floor
A kitchen island may feel stable when the cabinets and countertop are heavy, but weight alone is not a safe anchoring method. People lean on the counter, pull open loaded drawers, bump the base with stools, and place pressure on countertop overhangs. Over time, an unsecured island can shift, rack out of square, or put stress on plumbing and electrical connections.
The safest way to secure a kitchen island to the floor is usually to anchor wood cleats or an approved mounting base to the structural subfloor or concrete slab, then fasten the cabinet base to that support from a concealed location. The exact method depends on the flooring system, cabinet construction, hidden utilities, and countertop design.
If the island includes a sink, cooktop, dishwasher, electrical receptacles, a large stone overhang, or a post-tensioned slab, coordinate the installation with qualified trades before drilling. Unique Kitchen & Baths can include those details in a complete kitchen remodeling plan so the cabinetry, flooring, utilities, and countertop support work together.
Contents
- 1 Quick Answer: Match the Anchor to the Floor Below the Island
- 2 Before You Drill, Confirm These Five Conditions
- 3 Tools and Materials You May Need
- 4 Step-by-Step: Install a Stable, Concealed Island Base
- 5 Additional Stages of a Stable Island Installation
- 6 Special Instructions for Floating, Tile, and Hardwood Floors
- 7 Can You Secure a Kitchen Island Without Drilling?
- 8 Common Kitchen Island Anchoring Mistakes
- 9 Final Quality Checklist
- 10 Frequently Asked Questions
- 10.1 Does a kitchen island have to be secured to the floor?
- 10.2 How do you attach an island to a wood subfloor?
- 10.3 How do you anchor a kitchen island to concrete?
- 10.4 Can you screw through vinyl plank flooring?
- 10.5 Will construction adhesive hold a kitchen island in place?
- 10.6 Should the island be installed before or after flooring?
- 10.7 Can the island be anchored after the countertop is installed?
- 10.8 When should I stop and call a professional?
- 11 Make the Island Part of a Complete Kitchen Plan
Quick Answer: Match the Anchor to the Floor Below the Island
The visible floor is not always the surface that should hold the island. Tile, vinyl, laminate, and hardwood are finish materials. The attachment usually needs to reach plywood or OSB subfloor, floor framing, a concrete slab, or a manufacturer-approved mounting system.
Floor condition | Typical approach | Main risk to avoid |
Plywood or OSB over wood framing | Fasten concealed wood cleats to sound structural material, then attach the cabinet base to the cleats | Using screws that are too short, too long, or located over hidden utilities |
Concrete slab | Scan the anchor area, then use concrete-rated fasteners for the cleats or engineered base | Hitting conduit, plumbing, reinforcing steel, radiant heat, or post-tensioning tendons |
Ceramic, porcelain, or stone tile | Drill through the finish with the correct non-impact bit, then anchor into the structure below | Cracking the tile or treating tile and backer board as the anchor |
Nailed or glued hardwood | Predrill clean clearance holes where the approved plan allows, then fasten into structure | Splitting boards or ignoring seasonal wood movement |
Floating laminate or click-lock vinyl | Anchor the island to the structural floor and maintain the flooring manufacturer’s expansion gap around the fixed base | Pinning the floating floor beneath a permanent island |
This table describes common methods, not a universal fastening schedule. Cabinet and anchor manufacturers may require specific screw diameters, embedment depths, spacing, and attachment points.
Before You Drill, Confirm These Five Conditions
Here are the conditions that must be met for securing kitchen island to floor properly.
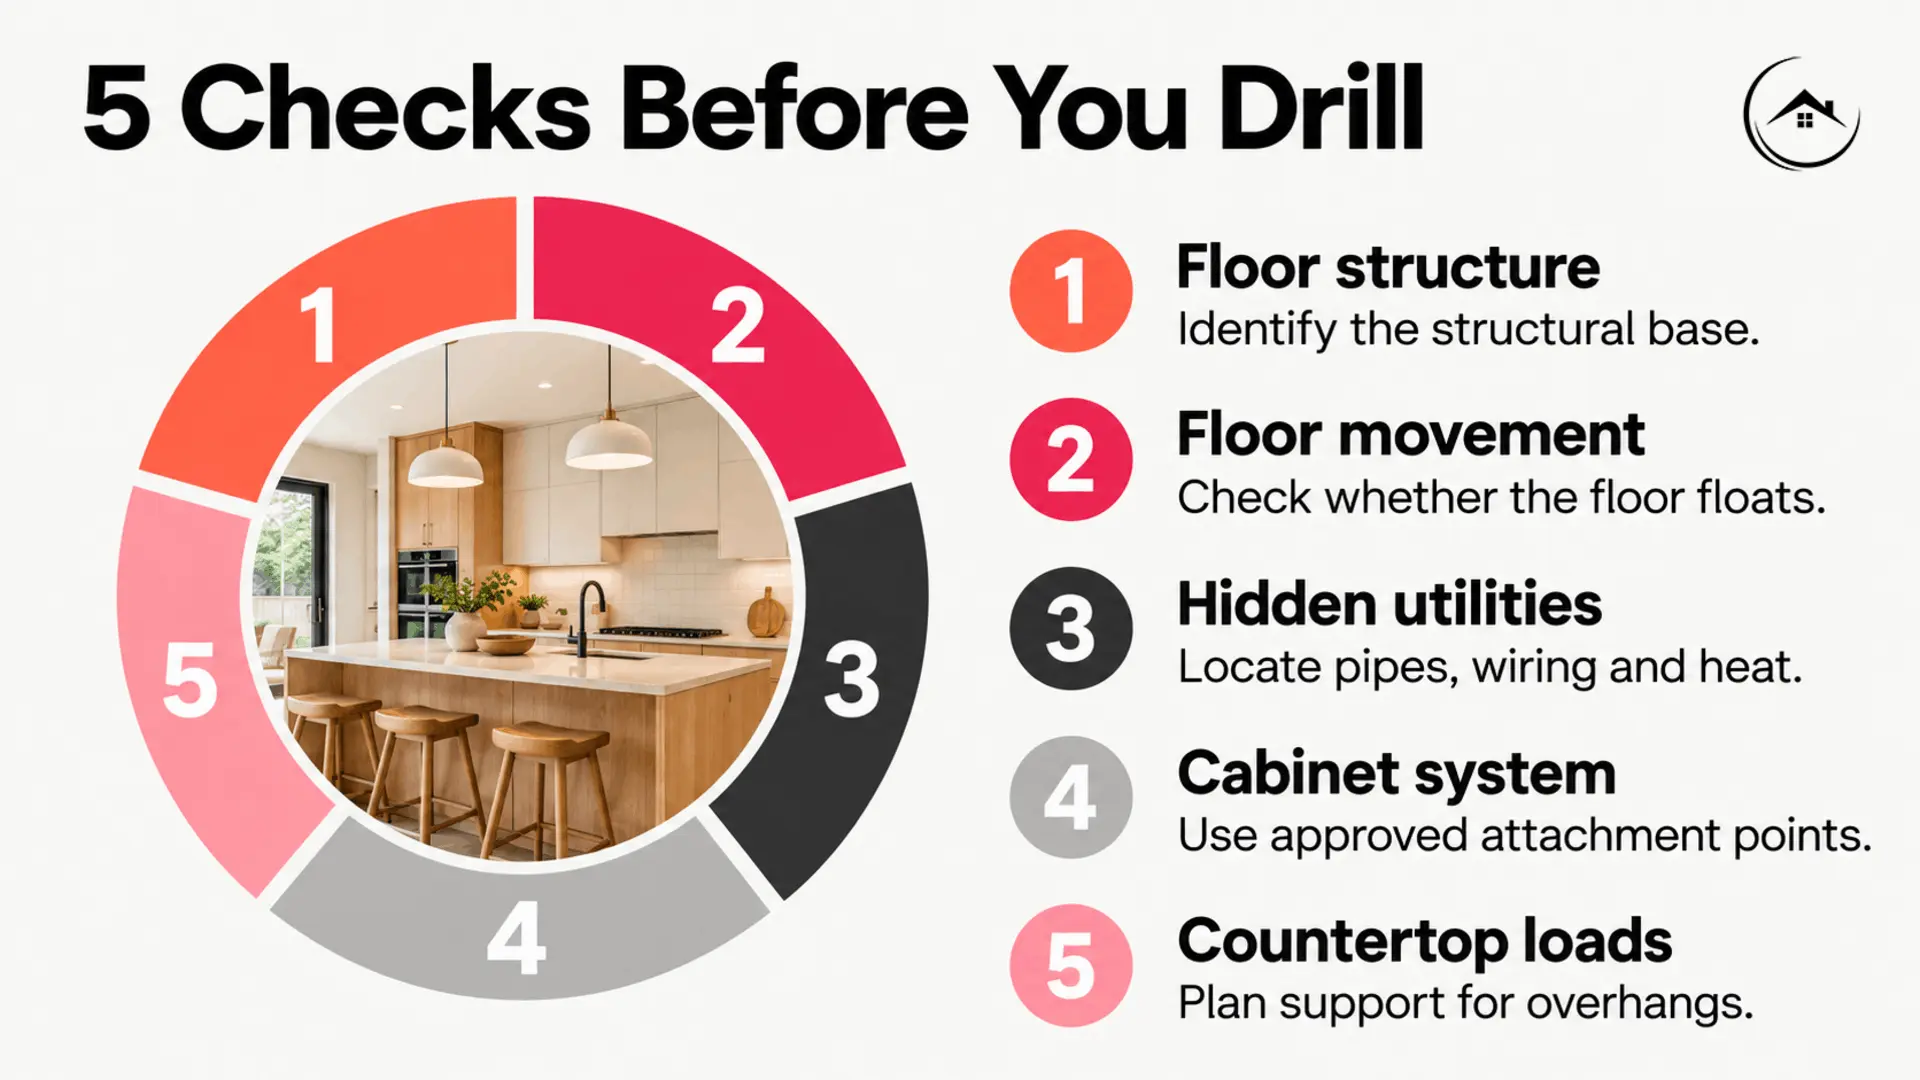
1. Identify the Finish Floor and Structural Base
Start by determining every layer below the island. A floor vent, appliance opening, threshold, crawlspace, or construction record may reveal whether the finish sits over plywood, OSB, sleepers, backer board, or concrete.
Do not assume a fastener that grips the visible flooring has secured the island. Thin underlayment, tile, and floating planks are not substitutes for structural attachment.
2. Find Out Whether the Floor Floats
Click-lock vinyl and laminate floors need room to expand and contract. A fixed island can prevent that movement if it traps the planks. The result may be open joints, buckling, or a denied flooring warranty claim.
Manufacturer instructions take priority. For example, Pergo states in its vinyl flooring warranty conditions that fixed cooking islands should not be installed on top of its click vinyl floor covering. UKB’s tips on installing vinyl plank flooring also explain why expansion space and subfloor preparation matter.
3. Locate Utilities and Structural Hazards
An island may contain wiring, receptacles, plumbing, a dishwasher, a cooktop, ventilation, or floor heating. Review plans when they are available and have uncertain areas located or scanned.
Concrete deserves extra caution. Slabs can contain conduit, water lines, reinforcing steel, and post-tensioning tendons. If you see a post-tension warning stamped in the garage or near the electrical panel, or if the slab design is unknown, stop before drilling. A qualified scanning and anchoring professional should verify safe drill zones.
4. Check the Cabinet Manufacturer’s Instructions
Cabinet boxes are built differently. Some have structural base rails that can be screwed to cleats. Others use leveling legs, a separate plinth, metal brackets, or an engineered mounting platform. Thin decorative skins, applied end panels, and removable toe kicks should not be treated as structural members unless the manufacturer says otherwise.
5. Account for the Countertop and Seating Loads
A stone top adds weight, but it does not replace mechanical attachment. Extended seating overhangs, waterfall ends, support legs, and appliances can also change how force reaches the cabinet base.
Coordinate support requirements with the countertop fabricator before the island is anchored. If you are still planning the layout, the UKB guide to kitchen islands with seating can help you compare overhangs, circulation, and seating needs. For wood surfaces, see the guide on how to install butcher block countertops.
Tools and Materials You May Need
The correct list depends on the floor assembly and the approved installation detail. A typical cleat-based installation may require:
- Tape measure, straightedge, and painter’s tape
- Long level or laser level
- Stud or joist information, floor plans, and utility-locating equipment as needed
- Straight, dry lumber or the cabinet manufacturer’s mounting base
- Cabinet connector screws
- Structural wood screws or concrete-rated anchors selected for the substrate
- Drill and bits suited to wood, tile, stone, or concrete
- Hammer drill only after the finish layer and drill zone have been evaluated
- Clamps and durable composite shims
- Eye and hearing protection
- Dust collection suitable for the material being drilled
Do not substitute drywall screws, finish nails, or unlisted plastic anchors. For concrete fasteners, follow the published instructions for bit diameter, hole depth, cleaning, embedment, edge distance, and installation torque. Tapcon’s concrete screw guidance is one example of manufacturer-specific information that installers should check before use.
Step-by-Step: Install a Stable, Concealed Island Base
Follow these steps to position, anchor, and level your island with concealed supports. Test the base for movement before installing the countertop.
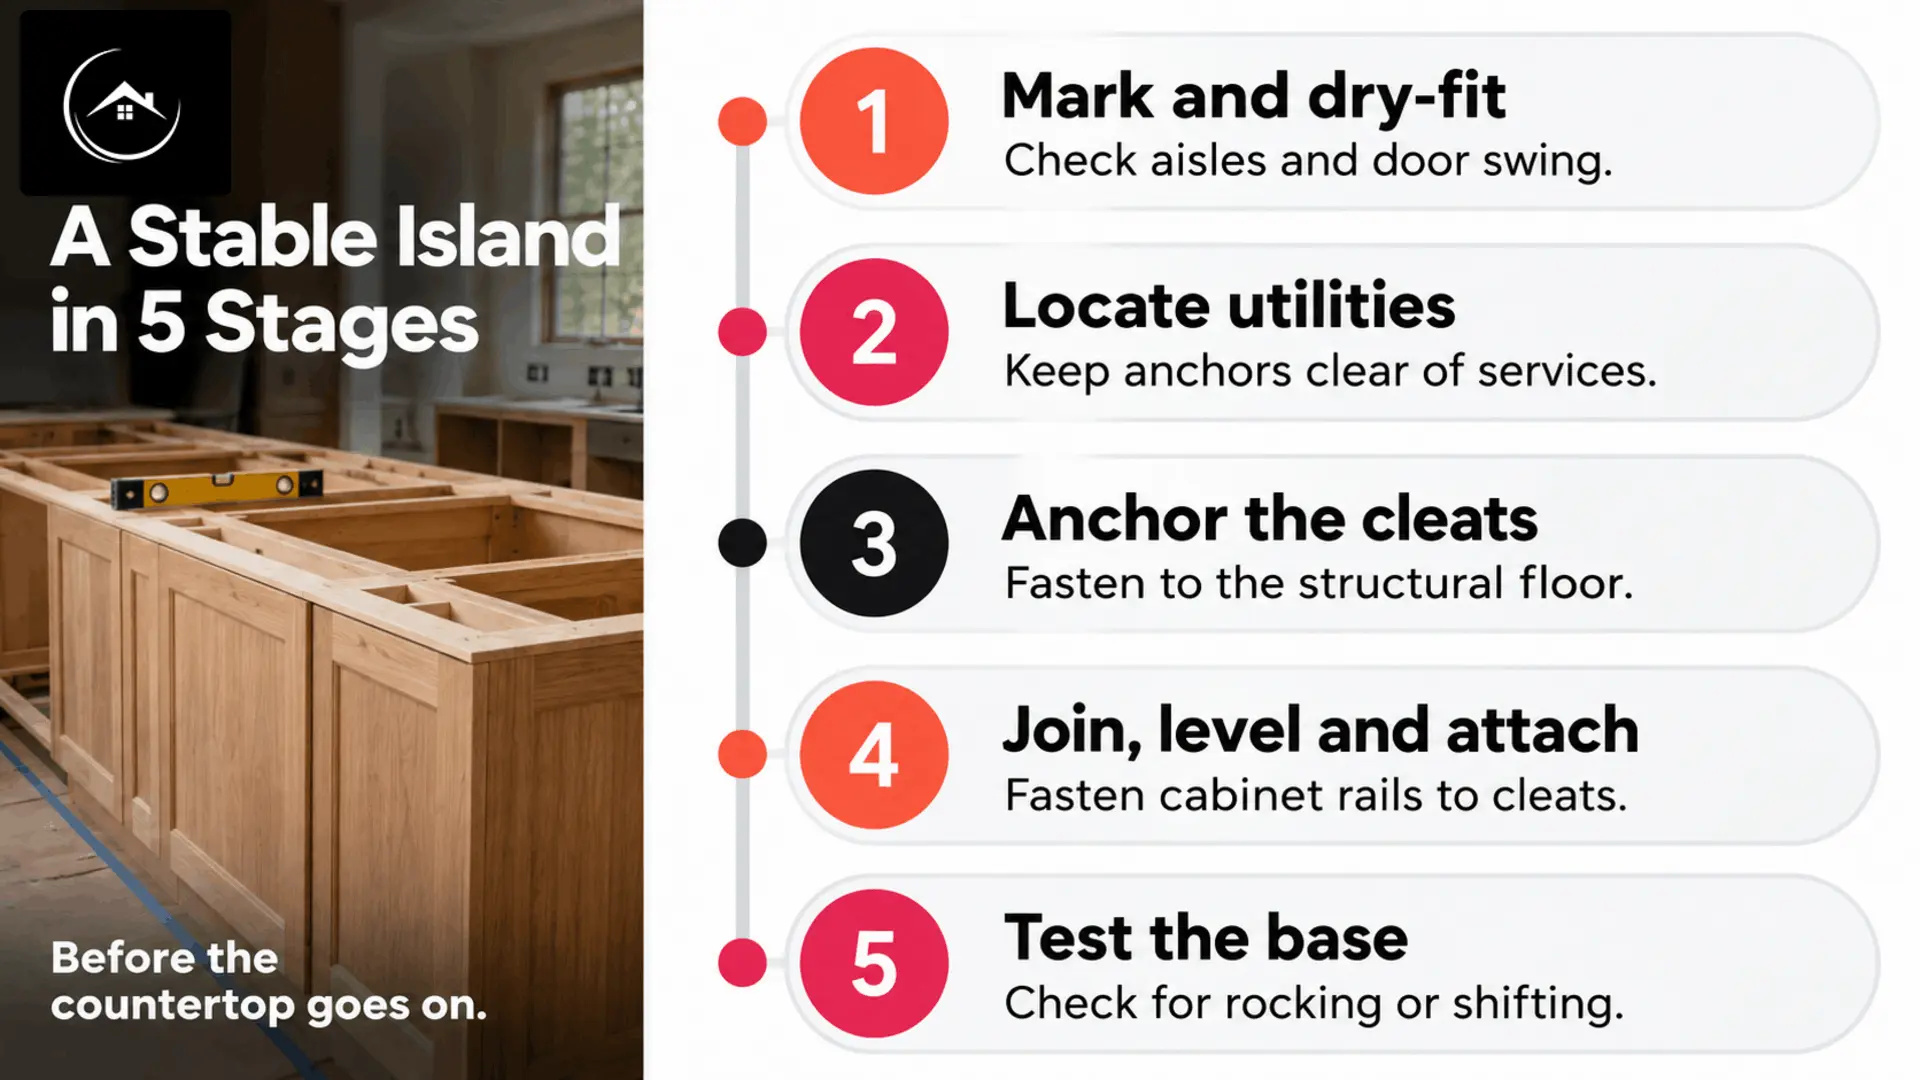
Step 1: Mark the Finished Countertop and Cabinet Footprints
Use painter’s tape to mark the outer countertop dimensions on the floor. Then mark the smaller cabinet-base footprint inside that outline. Include waterfall panels, decorative legs, seating supports, and appliance openings.
This two-outline method helps prevent a common layout error: positioning the cabinet correctly while leaving the finished countertop too close to an appliance, wall, or walkway.
Step 2: Dry-Set the Cabinets and Test the Kitchen Flow
Place the empty cabinet boxes in position before drilling. Open nearby drawers, appliance doors, and the dishwasher. Walk the main paths through the kitchen and test the seating area.
Check the cabinet tops from front to back and side to side. Mark where shims or adjustable legs will be needed. If the island consists of several cabinets, align their faces and clamp them temporarily so you can confirm the final footprint.
Step 3: Coordinate Utility Openings
Mark wiring, plumbing, drain, ventilation, and appliance routes before laying out the cleats. Keep fasteners clear of every known utility path. Leave enough access for shutoff valves, junctions, dishwasher connections, and future service.
Electrical and plumbing work may require permits and licensed trades. Local requirements vary, so confirm them before the cabinet closes off access.
Step 4: Position the Cleats or Approved Base
Trace the inside edge of the cabinet base, then place the cleats where approved structural cabinet members can reach them. The support should remain hidden behind the toe kick or finish panels without blocking leveling feet, vents, wiring, or plumbing.
Predrill the cleats when required. A split or twisted cleat can keep the island from sitting flat and weaken the connection.
Step 5: Anchor the Base to the Structure
Use the method that matches the substrate:
- Wood floor system: Fasten the cleats into adequate plywood or OSB, blocking, or framing as the project design requires. Verify screw length so the fastener achieves the needed penetration without reaching hidden services.
- Concrete slab: Confirm a safe drilling zone first. Drill to the anchor manufacturer’s diameter and depth, remove dust using the approved method, and install the fastener without exceeding the specified torque.
- Tile over wood or concrete: Use a bit and drilling method intended for the tile or stone. Avoid impact mode while penetrating a brittle finish. Once through the finish, switch to the method required for the structural substrate.
Try to move each cleat by hand. Correct any rotation, rocking, or loose fastener before placing the cabinets.
Additional Stages of a Stable Island Installation
Join and Level the Cabinet Boxes
Set the cabinets over or beside the cleats. Level the assembly with composite shims or the cabinet’s adjustable base system. Clamp adjacent cabinets with their front edges aligned, then join them through manufacturer-approved locations using cabinet connector screws.
The boxes should act as one rigid assembly before the countertop is installed. Recheck doors and drawers as the connectors are tightened.
Fasten the Cabinets to the Cleats
Drive screws through approved base rails or concealed toe-kick areas into the cleats. Predrill where needed to prevent splitting. Keep screw heads accessible until the final inspection is complete.
Do not attach the island through a thin decorative panel simply because the location is easy to reach. The connection needs to pass through a structural cabinet member.
Test Before Installing the Countertop
Push gently from several directions at countertop height. Open drawers fully and check for rocking, twisting, or shifting. Verify that the island is level, square, and properly spaced from nearby cabinets and appliances.
Correct movement now. A heavy countertop can hide a weak base temporarily, but it can also make later repairs more difficult and expensive.
Special Instructions for Floating, Tile, and Hardwood Floors
Your flooring determines how the island should be anchored. Allow floating floors to move, protect tile from cracking, and secure fasteners to the structure beneath the finished surface.
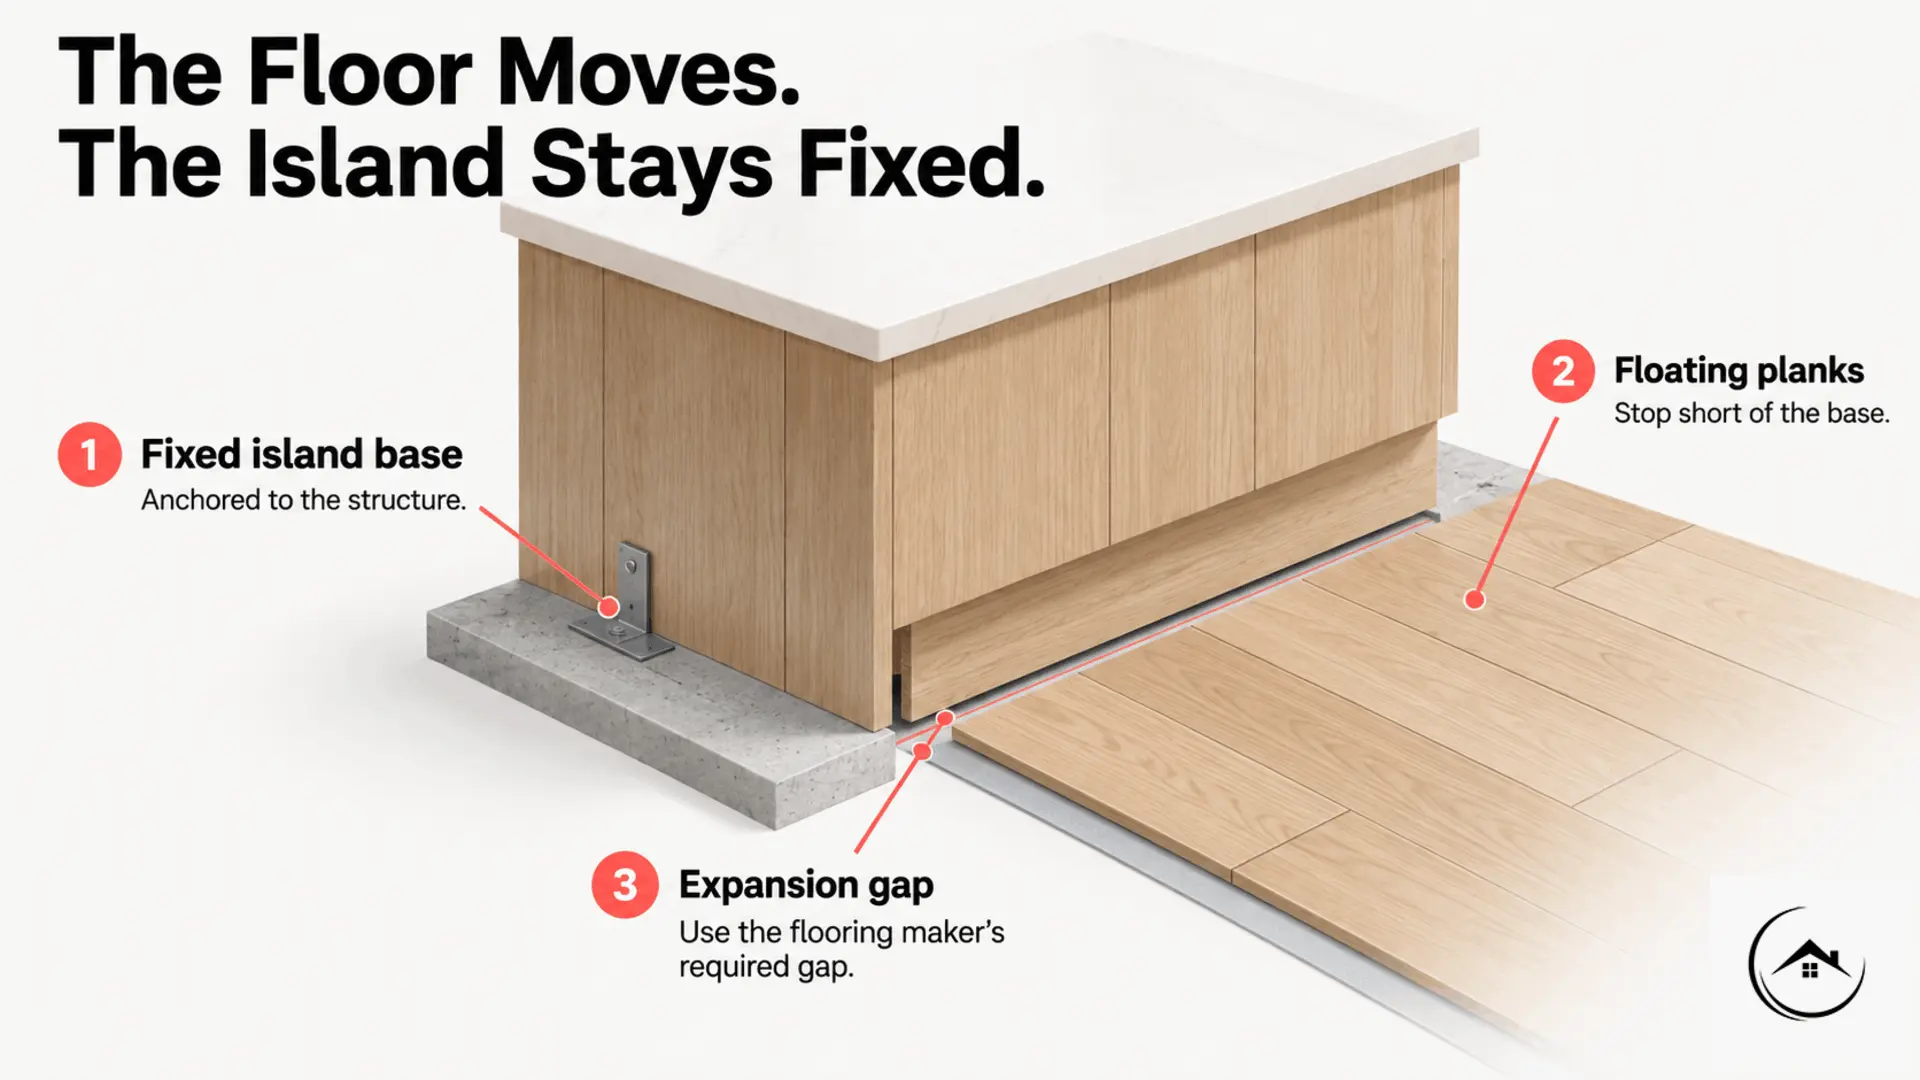
Floating Vinyl or Laminate
Do not screw through a floating floor unless the flooring manufacturer provides an approved detail. In many remodels, the island is anchored first and the floating floor is installed around it with the required expansion gap. A toe kick or molding covers the gap without restricting movement.
If the floor is already installed, ask the manufacturer whether the planks should be cut back around the fixed base. Do not guess, since requirements and warranties vary by product.
Ceramic, Porcelain, or Natural Stone Tile
Tile can crack from impact, pressure at an edge, the wrong bit, or an oversized anchor hole. Mark the hole carefully, use the tool recommended for the material, and penetrate the finish before using any impact action required for concrete below.
The tile is not the structural anchor. The fastener still needs to engage the subfloor, framing, slab, or approved mounting system beneath it.
Solid or Engineered Hardwood
First determine whether the wood is nailed, glued, or floating. Nailed and glued flooring may allow a clean clearance hole as part of an approved fastening detail, but the connection still needs to reach structure. Predrilling helps reduce splitting.
Also consider future refinishing and floor replacement. Installing a permanent island before the finish floor may reduce trapped outlines and simplify later work, depending on the flooring system and planned cabinet height.
Can You Secure a Kitchen Island Without Drilling?
Adhesive alone is usually not an appropriate substitute for mechanical fastening. It may damage the finish floor, complicate future removal, and still fail to resist the forces created by leaning, seating, and countertop overhangs.
A no-drill solution may be possible only when the cabinet or mounting-system manufacturer has designed and approved one for the specific island. A movable worktable or rolling island is a different product and should not be presented as a fixed, utility-connected island.
Common Kitchen Island Anchoring Mistakes
Professional help is not only about using the right drill. A coordinated installer checks the cabinet system, structural floor, finish material, utilities, countertop support, clearances, and inspection sequence as one project.
Mistake | What can happen | Better approach |
Relying on countertop weight | The base can still rack, shift, or tip under leverage | Mechanically fasten the base using an approved detail |
Fastening only to finish flooring | Tile, thin underlayment, or floating planks may crack or move | Transfer the load to the structural floor or engineered base |
Drilling before checking the slab | A bit can strike plumbing, wiring, reinforcing steel, or a tendon | Review plans and scan uncertain concrete before drilling |
Pinning a floating floor | Seasonal movement can cause gaps or buckling | Maintain the manufacturer’s required expansion gap |
Using drywall screws or finish nails | Brittle or undersized fasteners may fail | Use rated structural screws, cabinet connectors, or concrete anchors as specified |
Installing finish panels too early | Problems become harder to inspect and correct | Leave anchors visible until the island passes final checks |
Using the countertop to correct an uneven base | Seams, overhangs, and appliance clearances can become uneven | Level and square the cabinets before templating |
Final Quality Checklist
Before the countertop is templated or installed, confirm that:
- The island does not rock, rack, twist, or shift
- All cabinet boxes are joined through approved locations
- The assembly is level and square
- Drawers, doors, and appliances open without interference
- Finished aisle and seating clearances match the plan
- Anchors remain clear of utility routes
- Plumbing and electrical connections are protected and accessible
- Countertop supports match the fabricator’s requirements
- Toe kicks and decorative panels can be removed where future service access is needed
- Concealed fasteners and utility routes have been photographed for the project record
Frequently Asked Questions
Does a kitchen island have to be secured to the floor?
A permanent island should be mechanically secured according to the cabinet system, floor assembly, countertop design, and local project requirements. Weight alone does not reliably prevent movement or tipping.
How do you attach an island to a wood subfloor?
A common method is to fasten wood cleats or an approved mounting base to adequate structural material, then screw the cabinet’s structural base members to those supports from a concealed location. The correct fastener and penetration depend on the subfloor, framing, and hidden utilities.
How do you anchor a kitchen island to concrete?
First verify that the drilling area is clear of plumbing, conduit, reinforcing, floor heat, and post-tensioning tendons. Then install the approved base with concrete-rated anchors using the fastener manufacturer’s specified bit, depth, hole-cleaning method, and torque.
Can you screw through vinyl plank flooring?
Not until you know how the flooring is installed and what its manufacturer allows. Floating click-lock floors generally should not be pinned under permanent cabinetry. The planks may need to stop around the fixed island with an expansion gap.
Will construction adhesive hold a kitchen island in place?
Adhesive alone is generally not a replacement for an approved mechanical connection. It can damage finish flooring and make future removal difficult. Follow the cabinet or mounting-system manufacturer’s instructions.
Should the island be installed before or after flooring?
Permanent islands are often anchored before floating flooring, which is then installed around the base with the specified expansion space. Tile, hardwood, and other systems may require a different sequence. Coordinate the floor height, cabinet height, appliance openings, and manufacturer instructions before installation.
Can the island be anchored after the countertop is installed?
It may be possible, but access is limited and the added weight makes correction harder. The cabinet base should be anchored, leveled, and inspected before countertop templating and installation whenever possible.
When should I stop and call a professional?
Stop when the slab may be post-tensioned, utility locations are uncertain, the floor contains radiant heat, the floating-floor requirements are unclear, licensed electrical or plumbing work is involved, or the countertop needs engineered support.
Make the Island Part of a Complete Kitchen Plan
A secure island begins with more than a fastener. Its location, cabinet construction, floor system, utility routes, seating, and countertop loads all affect the final installation.
Unique Kitchen & Baths coordinates those parts as one remodeling plan for Orange County homeowners. Request a customized kitchen remodeling quote to discuss an island that fits the room, supports everyday use, and remains serviceable after the project is complete.

UKB
Unique Kitchen & baths is a family-owned business that is committed to providing high-quality kitchen and bathroom remodeling, as well as flooring installations at affordable prices.