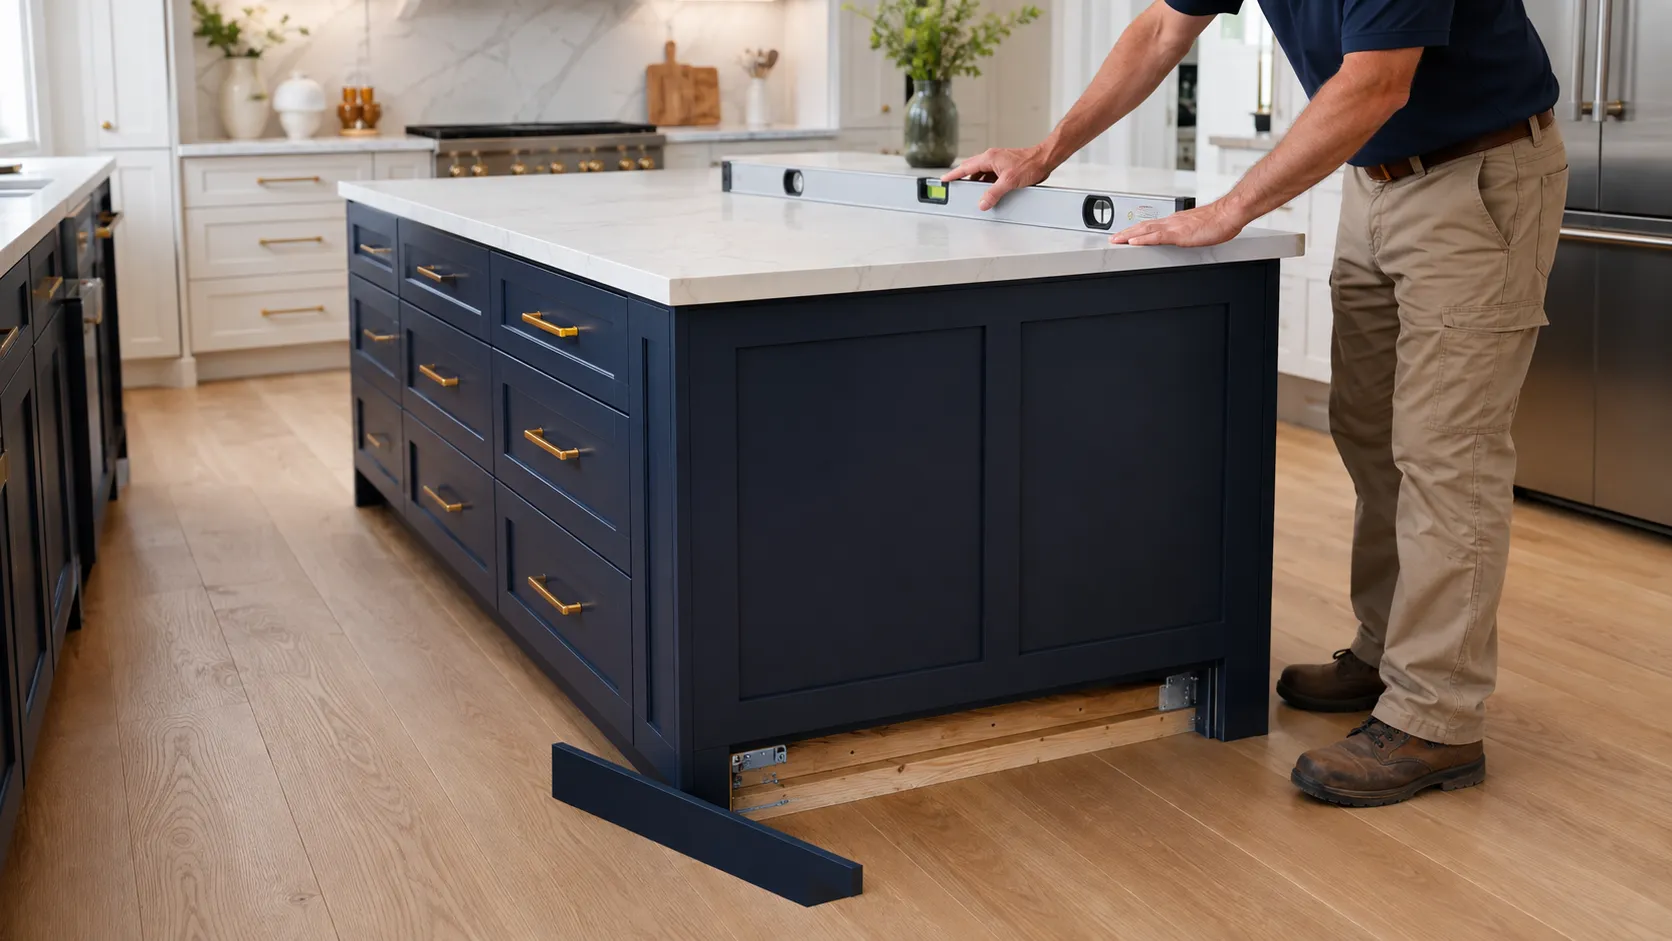
How to Secure Kitchen Island to Floor Without Damaging the Floor
A fixed kitchen island must resist more than its own weight. People lean against the countertop, drawers are pulled open, stools strike the back panel and a large overhang can create leverage at the cabinet base. Countertop weight alone is not a dependable anchoring method, especially for a narrow island or a design with seating.
The right answer to how to secure kitchen island to floor depends on the cabinet manufacturer, the structural floor below the finish, the presence of utilities and the countertop design. Professional kitchen design services can coordinate island anchoring with cabinetry, flooring, electrical, plumbing and countertop support before a single hole is drilled.
Contents
- 1 Identify the Floor Assembly and Hidden Conditions First
- 2 Choose an Anchoring Method That Matches the Island
- 3 Prepare the Layout, Tools and Safe Work Area
- 4 Secure a Kitchen Island Over a Wood Subfloor
- 5 Secure a Kitchen Island Over a Concrete Slab
- 6 Handle Floating, Tile and Hardwood Floors Correctly
- 7 Coordinate Utilities and Countertop Support Before Final Fastening
- 8 Common Island Anchoring Mistakes
- 9 Quality Checks Before the Countertop Is Installed
- 10 Frequently Asked Questions
- 10.1 Does a kitchen island have to be secured to the floor?
- 10.2 Can I screw an island through vinyl plank flooring?
- 10.3 How is an island attached to a wood subfloor?
- 10.4 How is an island attached to concrete?
- 10.5 Can construction adhesive secure a kitchen island?
- 10.6 Should the island be installed before or after flooring?
- 10.7 Can I anchor the island after the countertop is installed?
- 10.8 When should I hire a professional?
- 11 Build the Island as a Permanent Part of the Kitchen
Identify the Floor Assembly and Hidden Conditions First
Before deciding how to secure kitchen island to floor surfaces, determine what lies below the visible finish.
A fastener that grips tile, laminate or a thin underlayment but misses the structural subfloor or slab will not reliably resist movement. Drilling without locating utilities can cause far more damage than a loose island.
Distinguish Finish Flooring From the Structural Base
Common finish surfaces include hardwood, engineered wood, tile, luxury vinyl plank and laminate. Beneath them may be plywood or OSB over joists, a concrete slab, sleepers over concrete or another layered assembly. Locate a floor vent, appliance opening or threshold where the layers can be inspected without damage. Construction records may also identify the subfloor.
The island anchor needs to transfer load to appropriate structure. Fastening only to a floating plank, ceramic tile or thin backer board can crack the finish or allow the entire assembly to move.
Determine Whether the Floor Is Floating
Floating laminate and click-lock vinyl are designed to expand and contract as a continuous field. Pinning them beneath a permanent island can restrict that movement and lead to open joints, buckling or a flooring-warranty dispute. Pergo’s floating-floor guidance states that heavy fixed objects such as cooking islands should not be fixed or placed on top of its floating click-vinyl floor.
The UKB article with tips on installing vinyl plank flooring explains the importance of manufacturer requirements and expansion space. For a permanent island, the preferred sequence is often to anchor the cabinetry to the structural floor and install the floating finish around it with the specified expansion gap. If the floor is already in place, consult the flooring manufacturer before cutting or fastening through it.
Locate Plumbing, Wiring, Radiant Heat and Structural Tendons
An island may contain receptacles, a sink, dishwasher, cooktop, ventilation or hydronic or electric floor heat. Obtain plans when available and have the proposed anchor zone scanned or professionally located. Do not rely on a basic stud finder to rule out every hazard.
Concrete slabs can contain reinforcing steel, conduit, plumbing or post-tensioning tendons. The American Concrete Institute’s guidance on locating embedded reinforcement before drilling illustrates why nondestructive scanning may be necessary. If the slab is marked as post-tensioned or its construction is uncertain, stop and use a qualified scanning and anchoring professional.
Choose an Anchoring Method That Matches the Island
A sound plan for how to secure kitchen island to floor construction usually uses wood cleats or an engineered base fastened to the structural floor, followed by screws through the cabinet’s concealed toe-kick or base area into those cleats. The exact detail must match the cabinet system, load and site conditions.
Use Cleats to Create Concealed Attachment Points
Wood cleats are commonly laid out just inside the island’s base perimeter. After the cleats are anchored to the subfloor or slab, the cabinet boxes fit over or beside them. Screws driven through approved cabinet base members into the cleats prevent lateral movement without leaving visible fasteners on the finished exterior.
Use straight, dry lumber of sufficient thickness for the selected screw. The cleat must not interfere with leveling feet, toe-kick panels, vents or utility routes. Some cabinet manufacturers supply their own island brackets or installation details; those instructions take priority over a generic cleat layout.
Treat Decorative Panels and Toe Kicks as Finishes
A thin decorative end panel, furniture skin or removable toe kick is not automatically structural. Do not depend on brads through an applied panel to hold the island. Identify the cabinet’s base rails, stretchers or approved fastening zones.
Plan the attachment so fasteners remain serviceable. A removable toe-kick panel can conceal the screws while still allowing future access to utilities and cabinet connections.
Account for Countertop Overhang and Concentrated Loads
A long stone overhang, waterfall end, table extension or appliance can change the loads at the base. Decorative legs may not provide adequate structural support unless they are integrated into an engineered frame. Follow the countertop fabricator’s support requirements and the cabinet manufacturer’s load limits.
The UKB guide on how to install butcher block countertops discusses fitting and fastening countertop material, but the countertop and island base should be treated as separate structural decisions. A heavy top can increase stability in everyday use while also increasing the consequences of inadequate anchoring.
Join Multiple Cabinet Boxes Into One Rigid Assembly
Where an island uses several base cabinets, level and clamp the boxes before joining them through approved frame or side-panel locations. Use cabinet connector screws or the manufacturer’s specified fasteners, not drywall screws. Check door and drawer alignment as the boxes are tightened.
The combined island should behave as one unit before the countertop is installed. Anchoring individual boxes without properly joining them can leave joints that open under load.
Prepare the Layout, Tools and Safe Work Area
Careful preparation makes how to secure kitchen island to floor systems more accurate because the cabinet footprint, cleat setback and anchor locations must all agree. A layout error can place a screw outside the cabinet base or leave the island out of square with the room.
Mark the Finished Countertop and Cabinet Footprints
Establish the island centerline from the approved plan, then mark the finished countertop outline with painter’s tape. Mark the cabinet-base footprint inside it. Include waterfall panels, decorative legs and seating supports so the visual and structural footprints are not confused.
Measure clearances to the furthest finished edges and appliances. The UKB article on kitchen islands with seating can help coordinate the island footprint with stools and circulation before the cleats make the position permanent.
Dry-Set and Level the Cabinets
Place the empty cabinet boxes at the layout and confirm the required aisle clearances. Open adjacent appliance doors and walk every route. Check the cabinet tops with a long level or laser, then identify where shims or an adjustable base system will be needed.
Trace the interior edges of the cabinet base onto the floor. Transfer the location of structural base rails so the cleats can be positioned where screws will reach them without passing through thin panels.
Select Fasteners for the Substrate, Not by Habit
Wood subfloors, concrete slabs and engineered mounting systems require different anchors. Use the cabinet manufacturer’s instructions and the fastener manufacturer’s published requirements for diameter, embedment, pilot-hole size, spacing and edge distance. Do not substitute drywall screws, finish nails or unlisted plastic anchors.
For concrete, Tapcon’s concrete-screw guidance recommends the appropriate carbide bit and hammer-drill mode, with dust cleared from the hole. The correct anchor still depends on concrete condition, slab thickness and the island’s design loads.
Protect the Kitchen and Use Appropriate Safety Equipment
Remove doors, drawers and shelves when the cabinet manufacturer permits it. This reduces weight and prevents damage. Protect finished flooring with non-slip coverings that will not trap grit. Wear eye protection and hearing protection when drilling, and use silica-dust controls suitable for concrete or masonry work.
Keep the work area clear and do not drill into a blind location until utilities and structural hazards have been addressed. If the anchor detail requires work outside your training or the slab cannot be verified, stop and bring in a qualified installer.
Secure a Kitchen Island Over a Wood Subfloor
For a typical wood-framed floor, how to secure kitchen island to floor construction involves fastening properly positioned cleats through the finish where permitted and into an adequate structural subfloor or framing.
The cabinet is then leveled, joined and secured to the cleats through concealed structural members.
Step 1: Verify Cleat Position Inside the Base
Measure the cabinet toe-kick or base recess and mark the cleat lines so the cabinet will fit over them without interference. Keep the cleats far enough inside the outline to remain hidden but close enough for screws from the approved base rail to penetrate securely.
At utilities, leave access openings and protect required clearances. Do not create a closed cleat frame that blocks air movement, a floor register or a service route.
Step 2: Predrill the Finish and Structural Layer as Required
The drill bit and technique depend on the finish. Hardwood may need a clean clearance hole through the finished board to reduce splitting. Tile requires a bit intended for that material and gentle drilling until the tile is penetrated; hammer mode can crack many tile surfaces. Once through the finish, switch to the method specified for the substrate.
If the floor is floating, do not proceed without the flooring manufacturer’s approved detail. The correct solution may be to cut the finish away under the island and maintain an expansion gap around the fixed base.
Step 3: Anchor the Cleats to Sound Structure
Position the cleats on the layout, predrill them and install structural wood screws of the specified type and length. The fastener must achieve the required penetration without entering hidden plumbing, wiring or other services. Where the subfloor alone is not adequate for the design, blocking between joists may be required from below.
Check the cleats for level and alignment as fasteners are tightened. A twisted cleat can prevent the cabinet from sitting flat. Shim under a cleat only with a durable, approved material and fastening detail.
Step 4: Set, Level and Join the Cabinet Boxes
Place the cabinets over the cleats and confirm the finished position. Level front to back and side to side using composite shims or the cabinet’s leveling system. Clamp adjacent boxes with the face frames or front edges aligned, then join them using the approved cabinet screws.
Recheck the aisle, countertop overhang and appliance relationships. Once the boxes are fastened to the cleats, adjustment becomes more difficult.
Step 5: Fasten the Cabinet Base to the Cleats
Drive screws from inside the concealed toe-kick or approved base rail into the cleats. Predrill to avoid splitting the cleat or cabinet member. Use enough attachment points to resist racking and movement according to the cabinet instructions and project design; do not guess a universal spacing.
Install removable toe kicks or finish panels only after the structural screws are inspected. Avoid relying on finish nails where the manufacturer calls for screws.
Secure a Kitchen Island Over a Concrete Slab
On a slab, how to secure kitchen island to floor construction usually means anchoring cleats or a metal base with concrete-rated fasteners. This work requires more investigation because drilling depth and location must avoid embedded services, reinforcing and post-tensioning systems.
Step 1: Verify and Scan the Anchor Zone
Review plans, slab markings and utility routes. Have the area scanned when the slab design is unknown or post-tensioning, radiant heat, conduit or plumbing may be present. Do not use a short anchor as a substitute for knowing what is below the surface.
A professional can select safe zones and an anchor system that meets the required loads without unnecessary penetration.
Step 2: Mark and Drill Through the Finish Carefully
If tile or stone covers the slab, drill the finish with the correct non-impact bit and cooling method recommended for the material. Keep the hole away from tile edges and grout intersections where cracking risk may be higher. After the finish is penetrated, change to the concrete bit and drill the anchor hole to the manufacturer’s required diameter and depth.
Hold the drill perpendicular so the anchor seats correctly. Control dust with an appropriate vacuum system and personal protection.
Step 3: Clean the Concrete Holes
Concrete dust left in a hole can reduce anchor performance. Vacuum or clean the hole using the fastener manufacturer’s approved method. Confirm depth and inspect for spalling or an oversized hole.
Do not insert an anchor into a damaged hole and hope tightening will correct it. Relocation must respect edge distances and the verified safe drilling zone.
Step 4: Install the Anchors and Cleats
Set the cleat or base over the holes and install the specified concrete fasteners without exceeding the manufacturer’s torque. Overtightening can strip the hole, split the cleat or crack the finish. A washer may be required to distribute load, depending on the system.
After anchoring, attempt to move each cleat by hand. Any rotation or rocking must be corrected before the cabinet is installed.
Step 5: Level and Attach the Island to the Anchored Base
Set the joined cabinet assembly at the layout, shim with durable material and attach it to the cleats through approved structural members. Recheck plumb, level and square. Make sure a fastener has not entered a drawer path, appliance bay or utility chase.
Photograph concealed anchors and utility routes before installing toe kicks and panels. That record can help with future service or remodeling.
Handle Floating, Tile and Hardwood Floors Correctly
The finish floor changes how to secure kitchen island to floor structure without causing cracks or movement problems.
The anchor must engage the substrate, while the finish must retain the movement or edge treatment its manufacturer requires.
Floating Laminate and Click-Lock Vinyl
A fixed island generally should not pin a floating floor. The preferred remodeling sequence is to install and anchor the island first, then run the flooring around it with the specified expansion gap covered by a toe kick or molding. When an island is added over an existing floating floor, consult the flooring manufacturer about cutting back the planks and restoring the required perimeter gap.
Do not drive screws through the floating field simply because the island base will hide them. The damage may appear several feet away as seasons change.
Ceramic, Porcelain and Natural Stone Tile
Tile is a finish, not the primary anchor substrate. Drill it with the correct bit, speed and cooling method, then anchor into the structural layer below. A hollow-sounding or cracked tile should be evaluated before loading it with a permanent island.
Layout the cleats so holes do not fall at vulnerable edges when possible. Protect the tile from tool impact and clean abrasive dust before setting cabinet boxes.
Solid and Engineered Hardwood
Verify whether the floor is nailed, glued or floating. A nailed or glued wood finish may be drilled for an approved anchor detail, but the fastener still needs structural engagement. Predrill to reduce splitting and use a clean clearance hole through the finish if required.
Consider seasonal movement and the possibility of future floor replacement. An island installed before the finish can simplify later refinishing and avoid a trapped outline.
Coordinate Utilities and Countertop Support Before Final Fastening
A complete answer to how to secure kitchen island to floor construction must account for everything that passes through or loads the base. Anchoring first and then discovering that the electrical conduit, sink drain or seating support conflicts with a cleat creates unsafe improvisation.
Electrical Receptacles and Appliance Circuits
Island electrical requirements depend on the adopted local code, appliance load and design. A licensed electrician should route and protect wiring before cabinet attachment. Cleats and screws must remain clear of conduit, floor boxes and cable paths.
Do not notch structural cabinet members or drill a slab to create an unplanned cable route. Coordinate the cabinet cutouts with the electrician’s approved location.
Sink, Dishwasher and Water Connections
Plumbing penetrations need enough room for piping, shutoff access and future service. Seal floor penetrations as required and keep cleats from pressing against supply or drain lines. A dishwasher also needs a planned path for water, drain and power connections.
After cabinets are anchored, test the plumbing before closing all access panels. Movement that seems minor at the island can stress a rigid drain or supply connection.
Stone, Quartz and Extended Overhangs
Countertop fabricators may require steel brackets, corbels, panels or legs for an overhang. Those supports need a load path into the cabinet and floor system. Decorative components should not be assumed structural.
Confirm the island is level, square and rigid before the template appointment. Fabricating a heavy top to an out-of-square or moving base can create uneven seams and unsupported edges.
Common Island Anchoring Mistakes
Understanding how to secure kitchen island to floor systems includes recognizing practices that look secure on installation day but fail after the countertop, appliances and daily loads are added.
Using the Countertop Weight as the Anchor
A stone top increases mass but does not prevent racking or tipping under every condition. The base still needs an approved mechanical attachment to structure.
Fastening Only Into Finish Flooring
Tile, floating planks and thin underlayment are not reliable structural anchors. The connection must reach an appropriate subfloor, framing, slab or engineered base.
Drilling Before Locating Utilities and Tendons
Blind drilling can strike wiring, plumbing, radiant heat or post-tensioning. Verify the floor assembly and scan uncertain concrete before selecting anchor locations.
Pinning a Floating Floor
Screws through a floating field can prevent expansion and lead to separated joints or buckling. Follow the flooring manufacturer’s fixed-object detail and preserve the required expansion space.
Using Drywall Screws or Finish Nails
These fasteners are not substitutes for rated structural screws or concrete anchors. Select fasteners for the substrate, load and cabinet manufacturer’s requirements.
Hiding the Anchors Before Inspection
Install toe kicks and decorative panels after the cabinet has passed movement, level and utility checks. Concealed mistakes become expensive once the countertop is installed.
Quality Checks Before the Countertop Is Installed
A professional review of how to secure kitchen island to floor construction happens before the heavy top limits access. The cabinet base should be rigid, level and serviceable on its own.
Test for Rocking and Racking
Push the island from several directions at countertop height. Open drawers fully and apply ordinary operating force. The base should not rock, twist or shift. If movement is present, identify whether it comes from loose cleats, inadequate shimming or cabinet joints.
Do not use the countertop installation to mask movement. Correct the base first.
Confirm Level, Square and Finished Clearances
Check the cabinet tops with a long level and compare diagonal measurements where appropriate. Reconfirm aisle widths, appliance doors and seating clearances using the finished countertop projection.
A small error at the base can become a visible overhang or seam problem after templating.
Photograph Concealed Fasteners and Utilities
Take clear photos showing cleats, anchors, fastener locations, wiring protection and plumbing routes. Record the fastener product and drill depth used on a slab. Store the information with the remodeling documents.
Future installers can use that record to avoid drilling into the same services or damaging concealed anchors.
Frequently Asked Questions
These concise answers address the questions homeowners commonly have after learning how to secure kitchen island to floor assemblies.
Does a kitchen island have to be secured to the floor?
A fixed island should be mechanically secured according to the cabinet, countertop and local project requirements. Weight alone does not reliably resist movement or tipping.
Can I screw an island through vinyl plank flooring?
Not without confirming the flooring manufacturer’s instructions. Floating click-lock flooring generally should not be pinned by permanent cabinetry; the floor may need to be cut around the fixed island with an expansion gap.
How is an island attached to a wood subfloor?
A common method anchors wood cleats or an approved base to the structural subfloor or blocking, then screws the cabinet’s structural base members to those cleats from a concealed location.
How is an island attached to concrete?
Concrete-rated anchors can fasten cleats or a metal base to the slab after the area is verified safe, drilled to the manufacturer’s specification and cleaned. Post-tensioned or uncertain slabs require professional scanning.
Can construction adhesive secure a kitchen island?
Adhesive alone is generally not a substitute for the manufacturer’s mechanical fastening detail. It can also damage finish flooring and complicate future removal.
Should the island be installed before or after flooring?
Permanent islands are often anchored before floating flooring, which is then installed around the base with the required expansion gap. Other floor types and project sequences vary, so follow the flooring and cabinet manufacturers’ instructions.
Can I anchor the island after the countertop is installed?
It may be possible, but access is reduced and the heavy top makes correction harder. The base should be anchored, leveled and inspected before countertop templating and installation.
When should I hire a professional?
Hire a qualified installer when the slab may be post-tensioned, utilities are uncertain, the floor is floating, the island has plumbing or electrical work, or a large overhang requires engineered support.
Build the Island as a Permanent Part of the Kitchen
Knowing how to secure kitchen island to floor structure is not simply a matter of choosing a longer screw. The connection must respect the cabinet system, structural floor, finish-floor movement, hidden services and countertop loads. A rigid base installed in the wrong place, or anchored through a post-tensioned slab without verification, is not a successful installation.
Unique Kitchen and Baths coordinates cabinet installation, flooring, utilities, countertop support and circulation as one plan. Get a customized quote for your kitchen remodeling to install an island that feels integrated, remains stable and can be serviced safely in the future.