How to Install an Undermount Sink
An undermount sink looks simple after installation because the rim disappears below the countertop. The concealed connection is also what makes the job unforgiving. The sink must remain level under the weight of water, cookware, and possibly a garbage disposal while the narrow joint at the cutout stays clean and watertight.
How to Install an Undermount Sink is best treated as a countertop, cabinet, and plumbing project rather than a sealant-only task. The right process starts with material compatibility and mechanical support, then moves through alignment, sealing, plumbing, and testing. That sequence prevents the two failures homeowners notice most often: a reveal that wanders around the bowl and a damp cabinet that appears weeks later.
This guide reflects the way experienced remodelers evaluate the whole assembly. It explains what a careful homeowner can verify, where manufacturer instructions control the details, and when the weight or countertop material makes professional installation the safer choice.
Contents
- 1 Confirm That the Sink and Countertop Are Compatible
- 2 Plan Mechanical Support and a Full Dry Fit
- 3 Prepare the Cutout, Cabinet, and Bonding Surfaces
- 4 Seal, Lift, and Secure the Sink
- 5 Reconnect the Drain and Test the Assembly
- 6 Troubleshoot Rim Gaps, Sagging, and Moisture
- 7 Protect the Installation During Cure and Daily Use
- 8 Know When Professional Installation Is the Safer Choice
- 9 Frequently Asked Questions
- 10 Conclusion: Build the Support Before You Trust the Seal
Confirm That the Sink and Countertop Are Compatible
Before learning how to install an undermount sink, confirm that the countertop can expose a finished cut edge and that the sink, cutout, faucet, cabinet, and accessories can coexist. A perfect seal cannot correct the wrong template or an unsupported counter material.
Check the Countertop Material and Finished Edge
Quartz, granite, solid-surface material, and many porcelain slabs are common undermount candidates because their cut edges can be fabricated and polished. Standard particleboard-core laminate is usually a poor match because the exposed substrate can absorb water. Specialized laminate systems exist, but they require an approved sink, edge treatment, and fabrication method. Do not assume that a sink labeled dual-mount can be placed beneath any counter.
Stone and porcelain cutouts should be fabricated by a qualified shop using the sink manufacturer’s current template. Cutting or enlarging these materials in an installed kitchen can create dust, cracking risk, and an edge that is difficult to finish consistently. Kohler’s sink guide notes that undermount models are generally paired with solid-surface, stone, and quartz countertops, while top-mount models are often used with laminate.
Choose the Reveal Before the Cutout Is Made
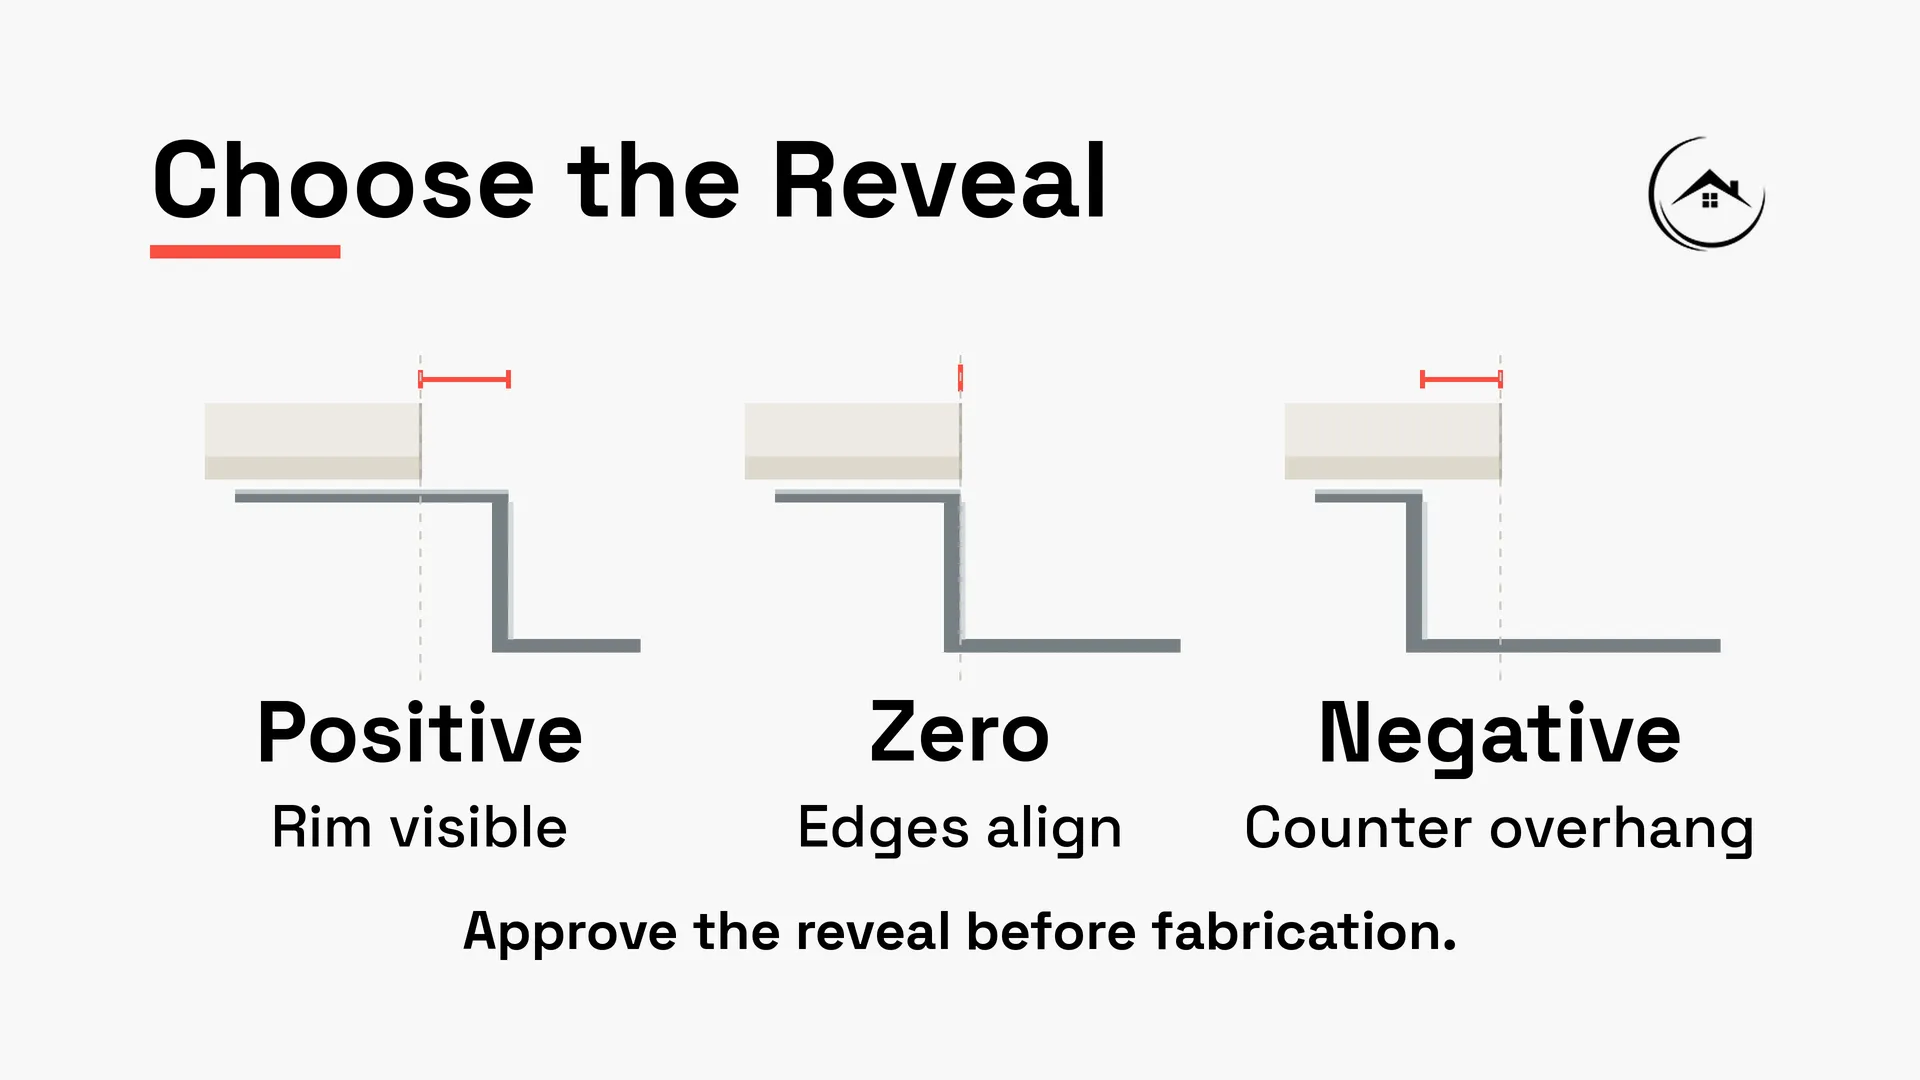
The reveal describes the relationship between the countertop edge and the sink opening. A positive reveal leaves a small portion of the sink rim visible. A zero reveal aligns the edge with the inside wall of the bowl. A negative reveal lets the countertop overhang the bowl slightly. None is automatically best, but the choice changes the cutout dimensions and the way crumbs and residue collect at the joint.
Agree on the reveal before fabrication and keep the actual sink available to the fabricator. Templates can vary by model revision, and nominal sink dimensions are not a safe substitute for a physical check. The drain position, faucet clearance, soap dispenser, air switch, and backsplash depth should also be confirmed before anyone drills the countertop.
Plan Mechanical Support and a Full Dry Fit
A reliable answer to how to install an undermount sink includes support that does not depend on cured silicone alone. Dry fitting reveals conflicts while the sink can still be lowered, shifted, or exchanged without damaging the counter.
Select a Support Method for the Sink’s Real Weight
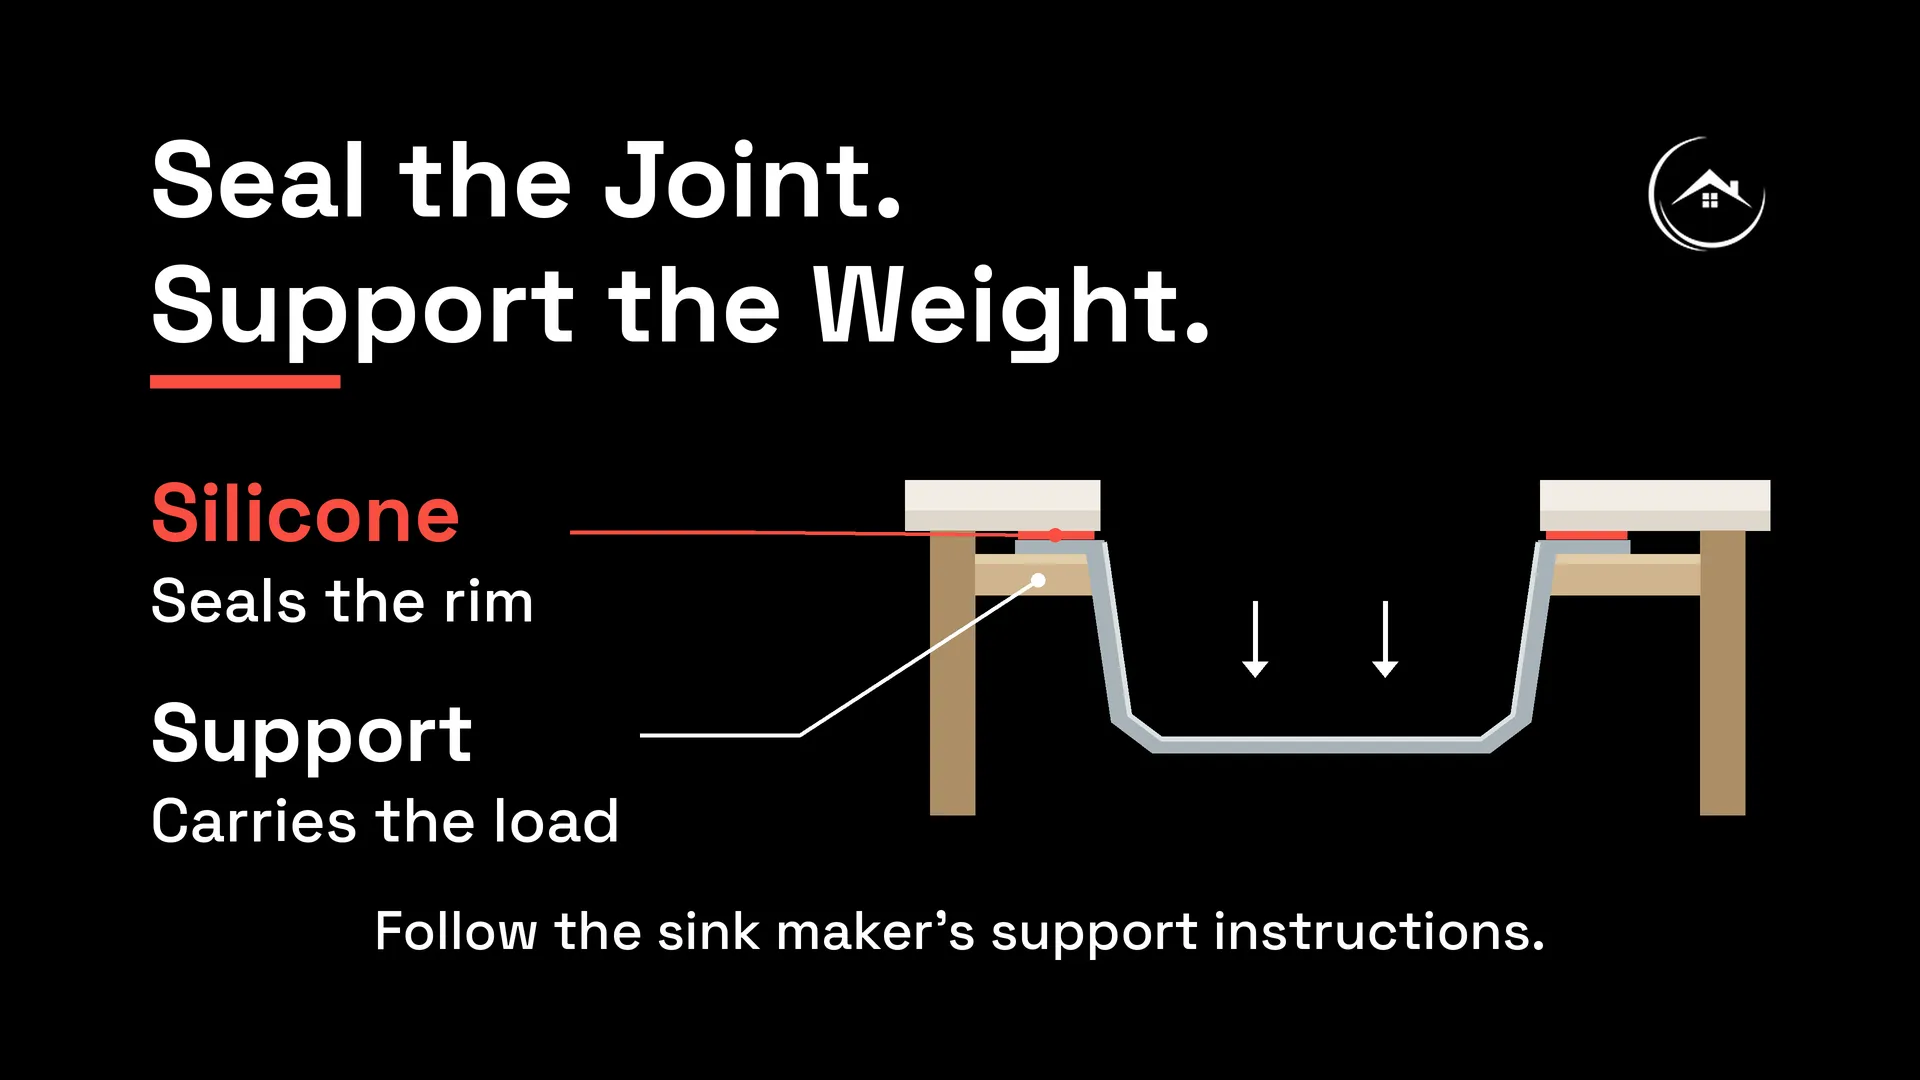
Common systems include manufacturer clips anchored into prepared inserts, adjustable rails spanning the cabinet, or a wood support frame fastened to the cabinet walls. The method must suit the counter material and sink design. Heavy fireclay, cast-iron, composite, and workstation sinks often need a frame or rail system capable of carrying the full loaded weight.
Kohler’s undermount installation guidance calls for support framing under applicable models and specifies 100 percent silicone at the rim. That distinction matters: the supports carry the sink, while the sealant closes the joint. Never drill random holes into a stone slab, and do not use screws long enough to penetrate a cabinet side or finished panel.
Check the Cabinet and Plumbing Before Applying Sealant
Set the sink on its supports without sealant and raise it into position. Confirm that the rim reaches the underside evenly and that clips or rails remain accessible. Check whether the bowl collides with drawer boxes, a pullout organizer, the faucet shanks, water-filter equipment, or the waste piping. A deep bowl can lower the strainer enough that an existing trap no longer lines up.
If the project is part of a larger renovation, the order of operations for a kitchen remodel can help coordinate cabinet leveling, template measurement, countertop fabrication, and final plumbing. This is also the time to compare alternatives. A farmhouse sink installation guide shows why apron-front models require a different cabinet and support strategy.
Prepare the Cutout, Cabinet, and Bonding Surfaces
Clean preparation is central to how to install an undermount sink because silicone cannot bond reliably to stone dust, oil, old adhesive, or moisture. Preparation also protects the visible counter edge from scratches and accidental tool contact.
Clean and Inspect the Underside of the Countertop
Support the countertop and sink safely, then inspect the cutout for chips, cracks, rough polishing, or a shape that does not match the selected reveal. Remove dust with a vacuum and clean the bonding surfaces with a product approved by both the countertop and sealant manufacturers. Allow the surfaces to dry fully. Strong solvents can discolor resin, damage some solid-surface materials, or leave residue, so the approved cleaner matters.
If replacing a sink, remove all old silicone without gouging the counter. A plastic scraper is safer near a finished edge than an exposed metal blade. Any remaining film can create a weak boundary between the new bead and the countertop.
Mark Alignment References During the Dry Fit
With the sink centered, place small removable reference marks on protected areas beneath the counter. Check the reveal at the front, back, and both sides rather than trusting one corner. Confirm that the drain is oriented correctly and that logos, accessory ledges, or offset bowls face the intended direction.
Elkay’s undermount sink specifications provide model-specific cutout templates and installation instructions, which illustrates why generic measurements should not replace the documents supplied with the sink. Keep the model number and template with the project records so a future replacement can be evaluated accurately.
Seal, Lift, and Secure the Sink
The critical installation stage in how to install an undermount sink is a coordinated lift that preserves a continuous seal while the bowl is aligned and mechanically secured. For a heavy sink, use two people and a stable lifting method rather than balancing the bowl from inside the cabinet.
Apply a Continuous Bead of Approved Sealant
Apply an even bead of manufacturer-approved 100 percent silicone around the entire sink rim or along the specified bonding area. The bead should be continuous, including around corners, but not so excessive that it creates a thick, flexible gap. Do not substitute construction adhesive unless the sink, counter, and support-system manufacturers explicitly approve it.
Sealant choice can change for certain composites, metals, or specialty surfaces. Read both product instructions and the sealant label. The goal is compatibility, adhesion, and a sanitary joint, not simply the strongest product on the shelf.
Lift the Sink Straight Into Position
Raise the bowl without dragging the rim through the bead. Bring it into contact with the underside and use the dry-fit marks to restore the chosen reveal. If a support frame is adjustable, raise each side in small increments. If clips are used, engage them loosely before making final corrections.
Look down through the cutout and check the reveal from several angles. A sink can appear centered at the front while being rotated slightly at the back. Make corrections while the silicone is fresh and before the hardware is fully tightened.
Tighten Supports Evenly Without Distorting the Bowl
Tighten opposing clips or adjust supports gradually so pressure spreads around the rim. Over-tightening can bend thin stainless steel, squeeze out too much sealant, damage inserts, or stress the countertop. Stop when the rim is held firmly and evenly according to the hardware instructions.
Remove visible squeeze-out promptly with the approved method, then inspect the entire joint under bright light. Do not disturb the bowl after cleanup. The support system should hold the sink in its final position while the sealant cures.
Reconnect the Drain and Test the Assembly
Knowing how to install an undermount sink also means preventing the plumbing from pulling on the new mount. Reconnect only after the sink is secured, and respect the sealant manufacturer’s cure time before loading the bowl or running a full test.
Align the Strainer, Disposal, and Trap Without Force
Install the basket strainer or disposal flange according to its own instructions. Rebuild the trap with washers facing the correct direction, and replace hardened or distorted slip-joint washers instead of overtightening them. The tailpiece and trap should meet naturally. If the deeper sink changed the elevation, reconfigure the piping with approved fittings rather than forcing the trap upward.
A garbage disposal adds concentrated weight and vibration. Verify that the sink manufacturer and support method allow it, and support the disposal during installation so the mounting ring is not used as a lifting point. Electrical work must comply with local requirements and should be handled by a qualified professional when a new circuit, receptacle, or switch is involved.
Perform a Staged Leak Test
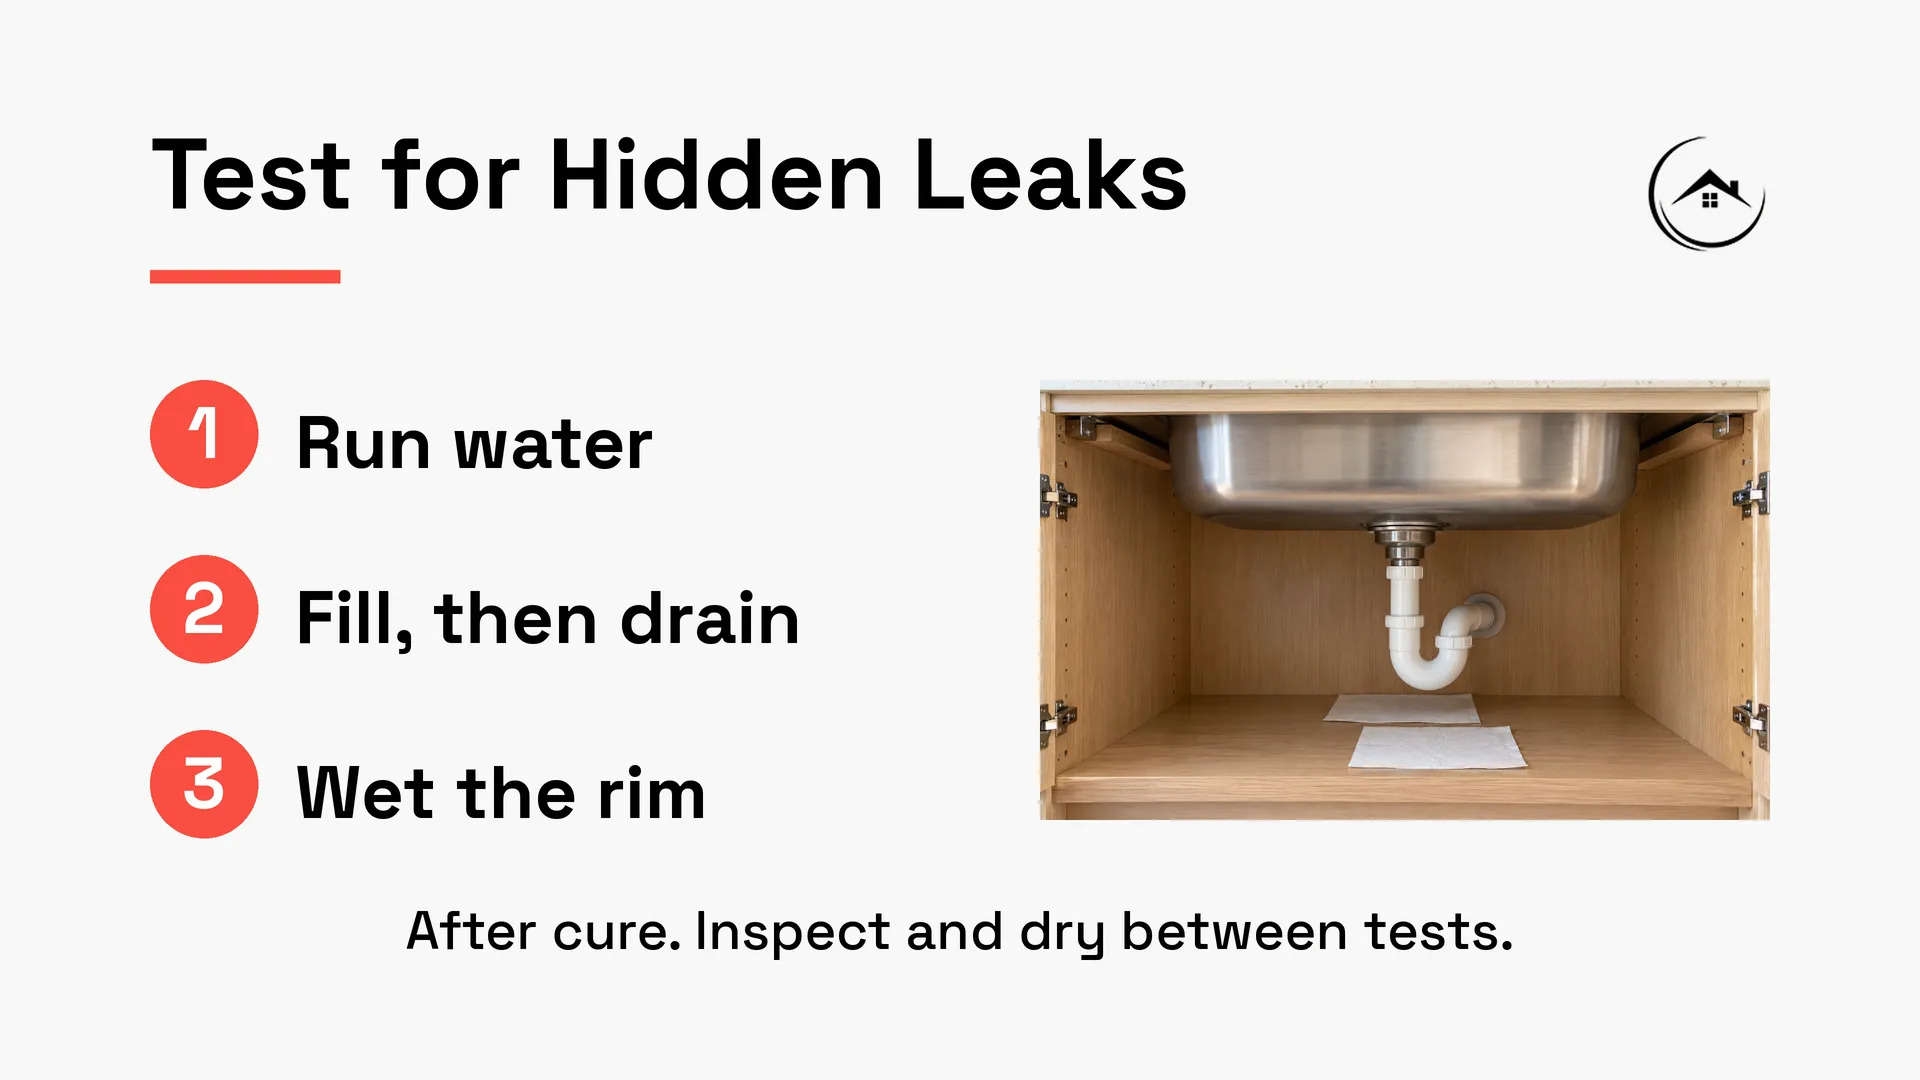
Start with a dry cabinet and place paper towels under the strainer, disposal flange, trap joints, and supply connections. Run a small amount of water and inspect each connection. Then fill the bowl partway, mark the water level, wait several minutes, and release the water while watching the drain assembly under full flow.
Finally, spray water around the countertop opening and check the sink-to-counter joint from below. A plumbing leak and a rim-seal leak require different corrections. Wipe everything dry between tests so the source remains clear.
Troubleshoot Rim Gaps, Sagging, and Moisture
This additional section makes how to install an undermount sink more useful after the tools are put away. Early symptoms often reveal whether the problem is alignment, inadequate support, failed sealant, or a separate plumbing connection.
Correct an Uneven Reveal Before the Sealant Cures
If the reveal changes around the bowl, first confirm that the sink is not rotated and that every support contacts the rim evenly. Loosen only enough hardware to reposition the sink while it remains safely supported. Do not pull one clip extremely tight to close a large gap. That can twist the rim and transfer stress into the countertop.
Once silicone has cured, a significant gap usually requires supporting the sink, disconnecting plumbing as needed, removing the old sealant, and resetting the bowl. Adding a surface bead beneath an open joint may hide the symptom without restoring structural contact.
Trace Water to Its Highest Wet Point
Water on a cabinet floor does not prove the undermount seam has failed. Dry the area and inspect from the top down. Moisture may start at the faucet shank, sprayer hose, soap dispenser, supply valve, strainer, disposal flange, or trap. The highest fresh wet point is usually more informative than the puddle below.
A darkened cabinet panel, swollen particleboard, musty odor, or recurring moisture deserves prompt attention. If water has already affected nearby finishes, guidance on countertop ideas on a budget can help frame repair and replacement choices without treating a concealed leak as a cosmetic issue.
Protect the Installation During Cure and Daily Use
Finishing how to install an undermount sink includes protecting the joint during its weakest period and watching the assembly as the kitchen returns to service. A careful cure and simple inspections extend the life of the seal.
Observe the Full Cure Time
Leave temporary braces, rails, or lifting supports in place for the time specified by the sealant and sink manufacturers. Avoid filling the bowl, mounting a disposal, or loading it with cookware before the joint is ready. Surface skinning is not the same as a full cure, especially in a cool or humid room.
Post a note at the sink if other trades are working nearby. A countertop installer, plumber, painter, or homeowner can unknowingly shift a fresh bowl by leaning on it or using it as a utility sink.
Inspect the Joint Instead of Caulking Over It
Periodically clean the joint with products approved for the sink, sealant, and countertop. Check for separation, dark residue that returns after cleaning, movement when the bowl is loaded, or support hardware that has loosened. Do not place a new bead over a detached or contaminated joint. Find the cause, support the sink, and renew the bond correctly.
Know When Professional Installation Is the Safer Choice
A responsible guide to how to install an undermount sink should identify the point where specialized fabrication, lifting, or plumbing skill reduces risk. The price of professional help is often small compared with replacing a cracked slab, damaged cabinet, or leaking ceiling below.
Bring in a Fabricator for Stone, Porcelain, or Cutout Changes
Use a qualified countertop fabricator when the cutout is missing, the opening must be enlarged, the edge needs polishing, or anchors must be installed in stone or porcelain. The actual sink and its current template should be on site. A fabricator can also confirm whether the remaining stone at the faucet deck, corners, and seams is structurally adequate.
Large cast-iron, fireclay, and workstation sinks also justify professional handling. Their weight complicates safe lifting and may require cabinet reinforcement before the countertop arrives.
Coordinate the Sink With the Entire Kitchen Plan
A sink installation touches cabinetry, countertop fabrication, plumbing, accessories, disposal power, and finish protection. Unique Kitchen and Baths can coordinate those trades so support height, cutout dimensions, plumbing clearances, and the selected reveal are resolved before installation day. That coordination is especially valuable when the sink is only one part of a cabinet or countertop update.
Frequently Asked Questions
These concise answers address common questions that arise while planning how to install an undermount sink. Always defer to the instructions for the exact sink, support system, countertop, and sealant.

UKB
Unique Kitchen & baths is a family-owned business that is committed to providing high-quality kitchen and bathroom remodeling, as well as flooring installations at affordable prices.